Bitrates, encoders, frame rates and scaling filters – OBS Studio is by far the best software available for your YouTube or Twitch streams, but learning it can be a lot to take in. Let’s dive into 3 categories of streams and how to optimize settings for each. We will get you set up with your best stream settings for OBS Studio!
But first: Don’t be afraid to use the Auto-Configuration Wizard! This can be found by clicking “Tools” at the top. This will automatically test your computer and internet connection to determine what OBS’s best guess at your optimal settings are. This is a great starting point for most people, but you might find yourself wanting to tweak a little more.

Best Stream Settings Contents
FPS / Fast Paced Game Streams
Fast paced, high-octane competitive multiplayer usually demands a fast-paced stream to go with it. So for this, we’ll focus on achieving that silky smooth 60FPS. In your Video Settings in OBS, Set your “Base (Canvas) Resolution” and “Output Resolution” to 1280×720 and set the “Common FPS Values” to 60.

In your Output Settings, leave “Output Mode” on Simple. Next to “Video Encoder” choose whichever “Hardware” option is available to you. For Nvidia GPUs, this will say “Hardware (NVENC, H264)”, for AMD GPUs it will say “Hardware (AMF, H264)”, for Intel GPUs it will say “Hardware (QuickSync, H264)”. Whichever is available to you, select it.
Nvidia and Intel GPUs provide the best quality for H.264, but modern AMD cards can still provide good enough quality and the performance you gain compared to trying to run Software X264 encoding is crucially important with competitive multiplayer gaming.
For “Encoder Preset”, choose “Balanced” on AMD or Intel, or “P4: Medium” for Nvidia.

Note: If you are streaming to YouTube instead of Twitch, I highly recommend selecting the HEVC or AV1 (when available) hardware encoders in this section instead of H264. (They will only show up after choosing YouTube in your Stream settings and signing in or putting in your stream key.) These are newer, more efficient video encoders that create much higher video quality for your bitrate than H264 and YouTube supports them. There’s nothing to lose from using these, and a lot of quality to gain.
Next we need to choose your Video Bitrate. Run an internet speed test and find out your internet connection’s upload speed. Your bitrate should not exceed 80% of your total available upload speed. If your maximum upload is 7mbps, then your bitrate should be no higher than 5600kbps (or 5.6mbps) for example. The maximum bitrate you can stream to Twitch is around 8mbps total for video + audio, but your individual local ingest server will impact this, so you might find that you have issues until you back the bitrate down to around 6mbps (the “official” cap).
For fast-paced game streams, getting as high of a bitrate as possible fed to your stream is important for the high frame rates. More frames need more bits to look good. Plus, FPS games have HUD elements and lots of tiny environment details that are tough to encode. So when possible, go as high as your platform allows – but you do need to balance that against reliability of your internet connection.
IRL/Just Chatting Streams
For live-action or talking head streams, frame rate is not important, and instead you just want to focus on looking good.
In your Video Settings in OBS, Set your “Base (Canvas) Resolution” and “Output Resolution” to 1920×1080 and set the “Common FPS Values” to 30.

In your Output Settings, leave “Output Mode” on Simple. Next to “Video Encoder” choose whichever “Hardware” option is available to you. For Nvidia GPUs, this will say “Hardware (NVENC, H264)”, for AMD GPUs it will say “Hardware (AMF, H264)”, for Intel GPUs it will say “Hardware (QuickSync, H264)”. Whichever is available to you, select it.
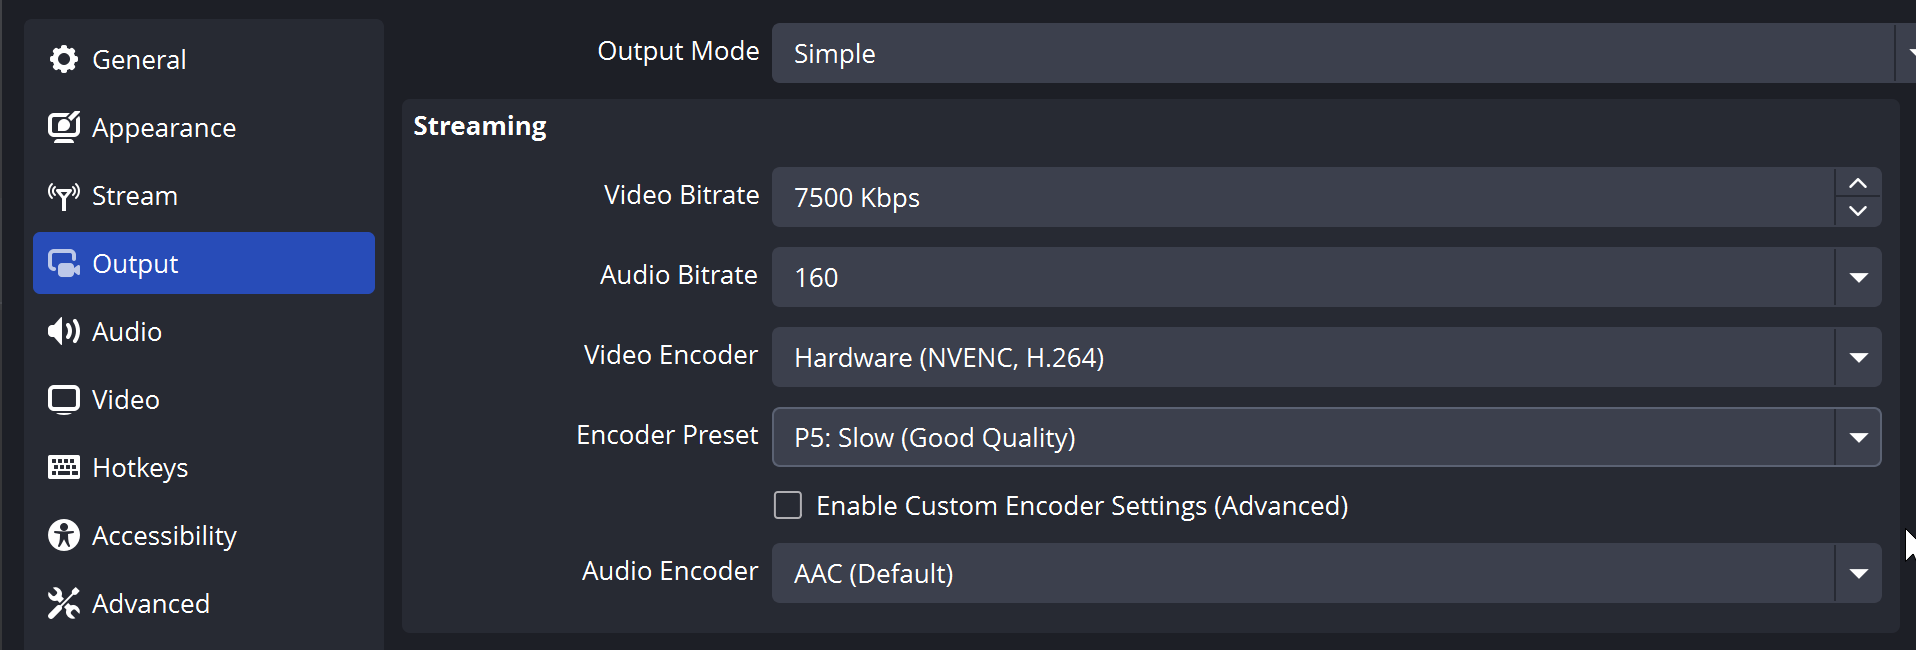
Nvidia and Intel GPUs provide the best quality for H.264, but modern AMD cards can still provide good enough quality and the performance you gain compared to trying to run Software X264 encoding is crucially important with competitive multiplayer gaming.
For “Encoder Preset”, choose “Quality” on AMD or Intel, or “P5: Slow” for Nvidia.
Next we need to choose your Video Bitrate. Run an internet speed test and find out your internet connection’s upload speed. Your bitrate should not exceed 80% of your total available upload speed. If your maximum upload is 7mbps, then your bitrate should be no higher than 5600kbps (or 5.6mbps) for example. The maximum bitrate you can stream to Twitch is around 8mbps total for video + audio, but your individual local ingest server will impact this, so you might find that you have issues until you back the bitrate down to around 6mbps (the “official” cap).
For talking head and IRL streams, there isn’t usually a ton of movement, and the lower frame rate means you can get away with lower bitrates. Your viewers do not need to see every pore on your face. Don’t stress the bitrate too much and focus on being entertaining. If you’re doing a mobile IRL stream or using wireless internet connections, consider dropping the resolution down to 1280×720 or even 854×480 to improve quality at the cost of sharpness.
High Quality Streams
Okay you just want the best quality possible in your live stream. I understand. You will need a really fast internet connection (fast upload speed, not just download) and a pretty beefy PC to handle it. Let’s tackle this based on platform.
Twitch
For Twitch, 1080p is still the highest you can reasonably send for your max bitrate (though that is quickly changing) so set your resolution to that in Video Settings. Set your “Common FPS Values” to 60 for gaming content, 30 for basically anything else.
In your Output Settings, leave “Output Mode” on Simple. Next to “Video Encoder” choose whichever “Hardware” option is available to you. For Nvidia GPUs, this will say “Hardware (NVENC, H264)”, for Intel GPUs it will say “Hardware (QuickSync, H264)”. Whichever is available to you, select it. Unless you have AMD.

For “Encoder Preset”, choose “Quality” on Intel, or “P6: Slower” for Nvidia.
If you have an AMD GPU, their H264 encoder doesn’t really keep up compared to Nvidia and Intel (in terms of quality), and I would suggest choosing “Software (x264)” instead. For “Encoder Preset” choose “fast”.
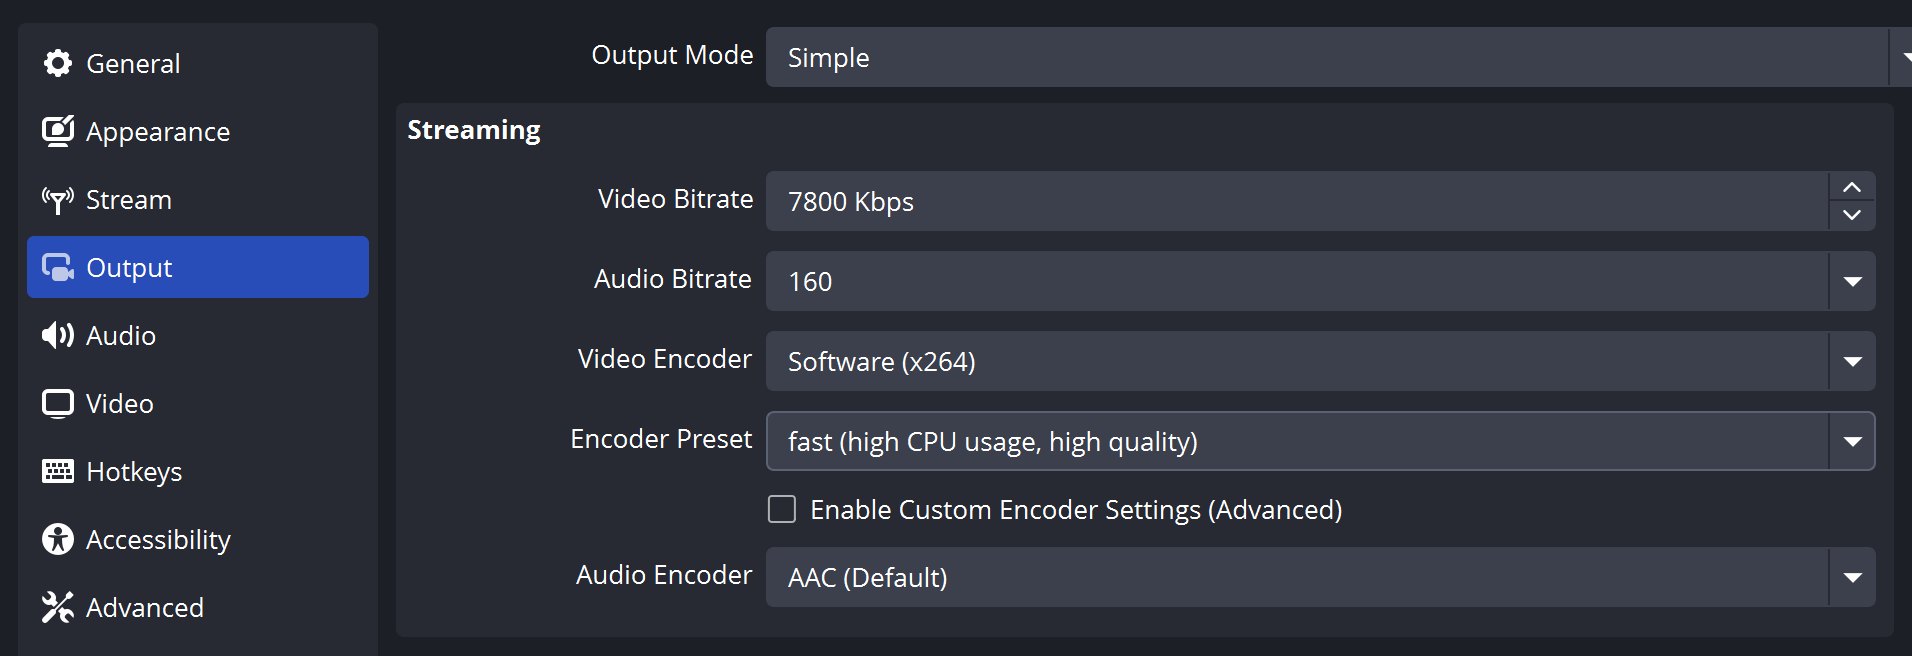
Next we need to choose your Video Bitrate. Run an internet speed test and find out your internet connection’s upload speed. Your bitrate should not exceed 80% of your total available upload speed. If your maximum upload is 7mbps, then your bitrate should be no higher than 5600kbps (or 5.6mbps) for example. The maximum bitrate you can stream to Twitch is around 8mbps total for video + audio, but your individual local ingest server will impact this, so you might find that you have issues until you back the bitrate down to around 6mbps (the “official” cap).
Obviously to get the best quality, you want to push the highest bitrate you can – but you can’t fight your internet connection. I typically push around 7800kbps for video to Twitch. Leave audio bitrate on 160.
YouTube
YouTube is a different beast entirely. YouTube does not forward the direct “Source” stream to viewers like Twitch does. Instead, every stream is transcoded (about 16 times) to different resolutions and codecs. This means you need to send higher bitrate than you would to Twitch in order to get good results, and I recommend pushing higher resolutions.
Videos and Streams sent to YouTube in 1440p or 4K get higher quality transcodes available to viewers. The quality difference between a 1440p or 4K stream and a 1080p stream is massive. So even if you’re gaming in 1080p, I’d recommend at least setting your “Output (Scaled) Resolution” in Video Settings to a 2560×1440. If you’re streaming screen-based content (tutorials, coding, pixel art games, etc.) use the Area scaling filter. If you’re streaming 3D content (live action, 3D games, etc.) use the Bicubic scaling filter. This will upscale your stream to 1440p for better quality on YouTube.

If you’re already gaming or working at 1440p or 4K, set your Base and Output resolutions to match that!
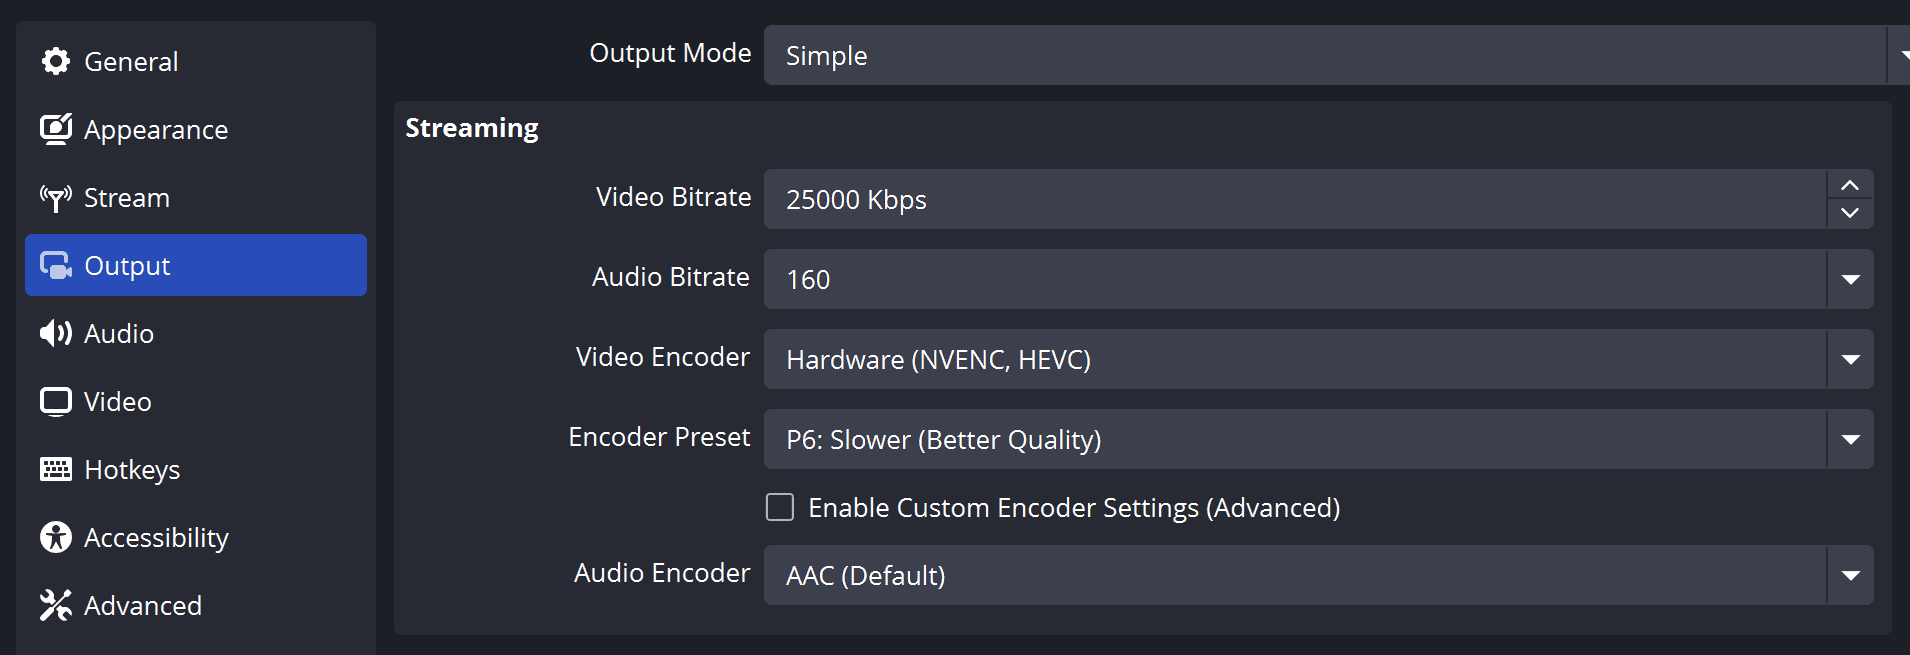
In your Output Settings, leave “Output Mode” on Simple. Next to “Video Encoder” choose whichever “Hardware” option is available to you. For Nvidia GPUs, this will say “Hardware (NVENC)”, for AMD GPUs it will say “Hardware (AMF)”, for Intel GPUs it will say “Hardware (QuickSync)”. Whichever is available to you, select it. But instead of choosing the “H264” option for your given encoder, choose the HEVC or AV1 option that is available. (They will only show up after choosing YouTube in your Stream settings and signing in or putting in your stream key.) These are newer, more efficient video encoders that create much higher video quality for your bitrate than H264 and YouTube supports them. There’s nothing to lose from using these, and a lot of quality to gain.
Next we need to choose your Video Bitrate. Run an internet speed test and find out your internet connection’s upload speed. Your bitrate should not exceed 80% of your total available upload speed. If your maximum upload is 7mbps, then your bitrate should be no higher than 5600kbps (or 5.6mbps) for example. The maximum bitrate you can stream to YouTube is around 50mbps or so, which is ridiculously high – but you need to send that extra bitrate to make up for YouTube transcoding (and for sending higher resolutions).
I recommend sending around 25mbps to 35mbps for 1440p (assuming HEVC/AV1) and around 30-50mbps for 4K.
Twitch Enhanced Broadcasting
Twitch’s entire streaming pipeline is changing. For the past year, Twitch has been working on and beta testing a new way to stream. Currently dubbed “Twitch Enhanced Broadcasting” this tool automatically determines the best settings for your hardware and network conditions and even handles the transcoding ladder for you.
This has the benefits of bringing transcoding to any streamer, regardless of whether you’re a Partner, Affiliate, or neither, improving quality, and reducing latency between what you say and your viewers hearing it.
This is still in beta: There’s an open beta for anyone to try right now and a closed beta for a select group to test things like 1440p streaming, 4K streaming and HEVC codec streaming.
This does not require any options, you just check the “Twitch Enhanced” box and start streaming.
I just wanted to mention this, as it will definitely become the de-facto way to stream to Twitch soon and make “best settings” chasing obsolete. But the downside is that encoding a full transcoding ladder does require more resources from your PC. (But the auto-configuration step it does should determine what you can handle for you.)

Alright, now stop worrying about quality and worry about making streams actually interesting to watch. Consider using one of Nerd or Die’s top-quality Twitch Overlays or Stream Alerts to add some personality to your stream.
Article by Epos Vox
New Posts
Hardware Acceleration for Live Streamers
July 30, 2025
If you're a streamer using OBS Studio, Streamlabs, or StreamElements overlays,…
0 Comments4 Minutes
How to Boost Engagement as a New Streamer (Across All Platforms)
June 17, 2025
Streaming to an empty chat room? Been there. The good news: building engagement…
0 Comments5 Minutes
Streamer Checklist
June 10, 2025
This checklist is built for streamers who want to stay organized and…
0 Comments1 Minute
