Cybernetik Setup Guide
General Information
Thanks for your interest in the Cybernetik alerts and overlay stream package. This guide will cover items downloaded from NerdOrDie.com and TwitchTemple.com . Please note that these items can be purchased separately or in a bundle. This page will guide you through the setup process. If you have any questions that aren’t answered in this setup guide, please feel free to contact us.
Photoshop is not required for any portions of this product. However, for your convenience we have included Photoshop files for the panels and offline screen.
Animated elements are supplied as WEBM files. These are video formats supported by browsers, such as those integrated in streaming software. This package has been designed for use with OBS Studio, XSplit Broadcaster, StreamLabs OBS, and most other streaming softwares. Please make sure your software fully supports WEBM files. If you are not familiar with how to set up your new overlay with either of these streaming applications, we strongly suggest checking out the below tutorial before moving on:
Before you Install
Fonts:
If you’d like to match the style of the overlay and alerts, use the fonts listed below.
- Kill The Noise– This is the font used for the titles
- Michroma – This is the font used for the label titles
- Quantico – This is the font used for the labels
Colors:
If you’d like to match the style of the overlay colors, use the codes below:
-
- Yellow – #FCEE0A
- Red – #F73550
- Cool White – #C8DBED
- Text Blue – #1CC3E6
Installation Guide
Streamlabs Alerts
In your downloaded files, open up the standard alert folder.
- Click the Alerts Quick Setup link to begin installing these alerts.
- If you’d like, choose “Create Widget Theme” and name it something appropriate such as package name. The import link will only override your alert package. This means you can combine these alerts with any other scene collection/widgets you’ve made in Streamlabs. If you want to save your old alerts, it’s highly recommended to do this in a new profile.
- Select “Use” for the profile you want to import into.
- Navigate to “Alert Box” and copy your unique URL.
- Paste this URL as a “Browser Source” in your streaming software.
Once you’ve added this into your streaming software test the alerts to make sure they’re working properly.
Width and Height of Source
We generally recommend setting the size to 1920 wide and 1080 tall (more height is recommended if using messages), however, depending on your stream adjust the size here may work better for you. If you need to scale down, you can do so directly inside of OBS Studio. If you’re using the Streamlabs OBS .overlay file, you may not need to complete this step if your alert box is already added in.
Delaying Text-to-Speech
If you’re planning on using text-to-speech you may need to delay them from being read, as there may be an intro animation and sounds (depends on the pack). To do this, you can change the Alert Text Delay in the Streamlabs base options. If you’re using alert variations (such as re-subs) you will need to update in the variations as well.
Once you’ve added this into your streaming software, test the widget to make sure they’re working properly.
Adjust Included Audio Levels
By default the alerts will feature custom sounds. If you’d like to disable these sounds, you can do so in each alerts “Custom Field” tab. You can mute the sounds by setting the slider to 0.
StreamElements Alerts Install
In your downloaded files, open up the Streamelements alert folder.
- Head over to Streamelements.com and ensure you’re logged in.
- Double click the Streamelements Alert set up link from your downloads
- This link will automatically open up the Streamelements website and begin the import.
- You should get a notification at the top of the Streamelements website stating the import was successful
- Head over to “My Overlays”
- You should now find the imported alerts named after the pack they are from.
- Click on the “Launch Overlay” to get the URL for your alerts
- Paste this URL as a “Browser Source” in your streaming software.
*NOTE: The Streamelements links are specific to your platform. You can only use the Twitch link for Twitch, and YouTube for YouTube.
Once you’ve added this into your streaming software, test the widget to make sure they’re working properly.
Adjust Included Audio Levels
You can adjust the audio levels using the default “Video Volume control” slider located in each alerts settings.
Installing Alerts, Goals, Chatbox and other Widgets in Streamlabs (If included)
In your downloaded files, open the folder to the widget you would like to install.
*(Alerts are a separate download. All other widgets can be found with the Overlays download)
- Click the Quick Setup link to begin installing the Widget.
- If you’d like, choose “Create Widget Theme” and name it something appropriate such as package name. The import link will only override your selected widget. This means you can combine these with any other scene collection/widgets you’ve made in Streamlabs. If you want to save your old widgets, it’s highly recommended you create the new profile.
- Select “Use” for the profile you want to import into.
- The page will automatically take you to the Widget settings for the widget you just imported.
- Click on the “Copy” button next to the unique URL.
- Paste this URL as a “Browser Source” in your streaming software.
Once you’ve added this into your streaming software, test the widget to make sure they’re working properly.
Width and Height of Source
We generally recommend setting the size to 1920 wide and 1080 tall (more height is recommended if using messages), however, depending on your stream adjust the size here may work better for you. If you need to scale down, you can do so directly inside of OBS Studio. If you’re using the Streamlabs OBS .overlay file, you may not need to complete this step if your alert box is already added in.
StreamElements Widgets Installation (Chat Box, Event List, Goals)
In your downloaded files, open the folder to the widget you would like to install.
*(Alerts are a separate download. All other widgets can be found with the Overlays download)
In your downloaded files, open up the Streamelements Widget or Alert folder.
- Head over to Streamelements.com and ensure you’re logged in to the correct account.
- Double click the Streamelements Quick Setup link for the widget you want to import.
- This link will automatically open up the Streamelements website and begin the import.
- You should get a notification at the top of the Streamelements website stating the import was successful
- Head over to “My Overlays”
- You should now find the imported widget named after the pack they are from.
- Click on the “Launch Overlay” to get the URL for your alerts
- Paste this URL as a “Browser Source” in your streaming software.
*NOTE: The Streamelements links are specific to your platform. You can only use the Twitch link for Twitch, and YouTube for YouTube, and Facebook for Facebook.
Once you’ve added this into your streaming software, test the widget to make sure they’re working properly.
Installing Streamlabs Desktop Overlays
The following steps are specific to Streamlabs Desktop and the .overlay file. Only Streamlabs Desktop can make use of the .overlay file. If you’re using streaming software other than Streamlabs OBS, please follow the steps in the “Overlays” and “Scenes” sections.
- Download and install Streamlabs Desktop if you haven’t already
- Unzip the files you’ve downloaded onto your computer.
- Open/Run Streamlabs Desktop.
- Open the Streamlabs Desktop settings by clicking the settings wheel at the bottom left corner
- Click on “Scene Collections” on the left of the pop-up menu
- Click on “Import Overlay File”
- Browse to your unzipped files
- Select the “.overlay” file
*NOTE: After selecting the file, it may take several minutes to for all the resource to load. This will setup the transition (if included) and multiple Scenes (Starting, Ending, BRB etc…)

Installing the Overlays – StreamElements
In your downloaded files, open up the Streamelements alert folder.
- Head over to Streamelements.com and ensure you’re logged in.
- Double click the StreamElements Overlay set up link from your downloads
- This link will automatically open up the StreamElements website and begin the import.
- You should get a notification at the top of the StreamElements website stating the import was successful
- Head over to “My Overlays”
- You should now find the imported Overlay scenes named after the pack they are from, and what they’re intended for.
- Click on the “Launch Overlay” to get the URL for your alerts
- Paste this URL as a “Browser Source” in your streaming software.
*NOTE: The StreamElements links are specific to your platform. You can only use the Twitch link for Twitch, and YouTube for YouTube.
Once you’ve added this into your streaming software, test the widget to make sure they’re working properly.
Width and Height of Source
We generally recommend setting the size to 1920 wide and 1080 tall (more height is recommended if using messages), however, depending on your stream adjust the size here may work better for you. If you need to scale down, you can do so directly inside of OBS Studio. If you’re using the Streamlabs OBS .overlay file, you may not need to complete this step if your alert box is already added in.
Installing the Overlays using our script
Before we import the Overlays, let’s cover a couple basics. With OBS Studio open:
- Click on the Tools tab
- Select Scripts
- Click the “+” Towards the bottom of the Scripts window
- Navigate to your extracted “Overlays” folder and the “~OBS Studio – Quick Install” folder
- Select the Quick Import “.lua” file and click “Open”
- In the Scripts window, select the loaded script.
- On the right hand side of the window, you’ll now see the import options.
- If you want to set up all the Scenes shown in the list, click on the “Setup all scenes” button.
- If you only want to set up just specific elements included in the pack, you can change the drop down menu to “Sources”
- Click on the “Add…” button for the element you wish to add. This will add it to the current scene you have shown in OBS.
- Once you’ve click on the “Setup all scenes”, click close on the Scripts window. You’ll now see all the scenes have been setup for you.
Installation of this product involves using media, image, and text sources. If you’re unfamiliar with these, please make sure to familiarize yourself with the streaming software you use.
- Unzip the files you’ve downloaded onto your computer.
- Open your streaming software. Add animated parts (WEBM files) by adding “media sources” and locating your desired overlay elements. There are preset layouts OR modular elements to customize to your needs. Mix and match as needed. Please note: if you’re using the free version you will use image source, not media source.
- Customize the text shown on the supporter bars with the blank versions of all the elements have been provided. The easiest way to add you custom text is to load one of these blank WEBM files and add a ‘text’ layer over the top using the recommended font.
- To add dynamic supporter tags, add in text sources and connect them to the appropriate text file. This will be done using apps like StreamLab’s Stream Labels or the Muxy Ticker. We recommend using the fonts listed in the “before you install” section.
- Any scenes can be set up in a similar process (Starting Soon, BRB, etc.). In your new scenes you will add in media files from the “Screens” folder, images from the “Icons”, and text sources to add custom text needed. Again, please use the recommended font.
- Please use any demo images or movies for reference on recommended layouts.
Setting up your scenes in standard streaming software:
- In a new scene, add a media source
- Set this source to looping, and select a local file
- Choose the “Stream-Background.mp4” file, which is a blank looping background
- Add another media source, set to looping, and select the appropriate Stream- .WEBM file (Starting, BRB, Ending)
- Add in image sources for icons (found in the icon folder) if desired
- Add in text sources, using the recommended font, and place next to the icon if desired.
Using StreamLabs OBS import for scenes:
- Right click and duplicate the “Scene (Duplicate as needed, view setup guide)” scene
- Rename to anything you’d like, and position where needed.
- Hide or remove the starting, brb, and/or ending media source, depending on the type of scene you’d like to use
- Replace the text sources with your information
- Add additional text sources and icons (via image source) if desired
Setting up a stinger transition between scenes is easy with OBS Studio.
Important: We’ve included stinger videos at 15, 30, and 60fps. Please choose the one closest to the FPS you stream at. Higher fps video will use more CPU.
OBS Studio
- Under the “scene transitions” section, click the drop down and select “Stinger Transition”
- Click the gear icon and select properties
- For “video file” click browse and select the stinger.webm found in the “Screens” folder
- Set the “transition point type” to time and “transition point” to 1000
- Enable sounds by setting “Audio Monitoring” to “Monitoring and Output”
- Click OK
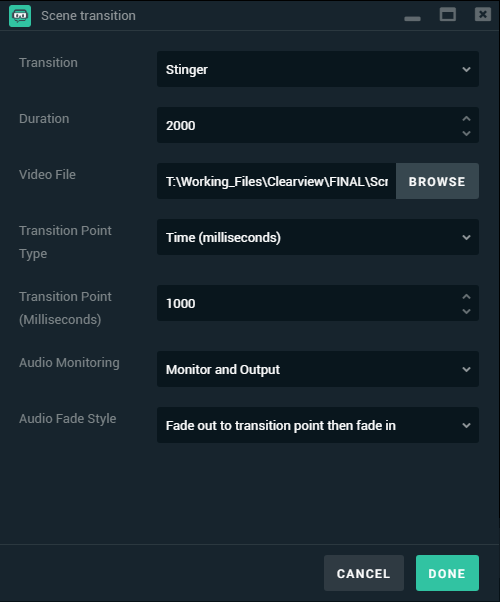
StreamLabs OBS
- Click the gear icon above your scenes
- Set the “Transition” option to “Stinger”
- Set the “Duration” to 2000
- Select Browse for the “Video File” and choose the stinger file found in the “Screens” folder
- Make sure “Transition Point Type” is set to “Time (milliseconds)”
- Set the “Transition Point (milliseconds)” to 1000
- Enable sounds by setting “Audio Monitoring” to “Monitoring and Output”
- Leave other settings on their defaults
- Hit Done
Customizing Colors
Adjustment of colors can be done in OBS Studio and StreamLabs OBS by using color correction filters. If you’re not familiar with filters, please watch this video.
If you’d like to adjust your Twitch panels, please use the .psd file found inside the “Panels” folder. You may also use the blank.jpg file with any image editing software.
Default green color is #05f5ae
Usage Terms
The user may use these alerts for personal and commercial use. It is intended for one (1) user and one (1) device only. These usage permissions do not expire. Re-distribution is strictly prohibited. The alert graphics and code remain the property of Twitch Temple and Nerd Or Die unless written permission is granted.
Please refer to our Terms and Conditions for more information.
Future Reiterations, Errors and Updates
This version of the alert is provided as is. If there are missing elements or you think something critical needs addressing, please contact us outlining the issue and provide the email used to purchase the product. You are allowed up to 5 downloads per product.
Please follow @NerdOrDieCom on Twitter for update information.
Changelog
To receive these updates simply re-download the product via the email link, or on your account page when logged in.
- Product released – No updates at this time.