The free scene maker is now available! It’s been awhile since we’ve released a free resource, but I hope this new free resource makes it worth the wait. With our scene maker, you can create and customize your own intro, be right back (AFK), and outro scenes quickly, easily, and of course for free. You can even make scenes that feature your game play in the background while you wait for in-game queues.
What is the Scene Maker?
There’s a lot of ways that this product can be used, so let’s take a quick look at what I’m talking about. The default scene design is pictured below. You’ll be able to change out the background video or use an image, update what all the text says, change the fonts, change the colors, and much more. All of this can be done with a couple of easy steps that I’ll explain in this post.
In the top left we have social media popups that will animate and show off your social networks. In the bottom left, you’ll see labels that will display your recent follower, biggest tipper, latest sub and more. The bottom right has a countdown that can be customized to last longer, and display different messages. There’s also a message that displays when the countdown ends! In the middle we have a heading and sub heading that you can change out, and even a logo or brand image which you can add in as well. We’ll use the settings generator to customize all your settings – so it will be quick, easy, and you’ll even be able to make multiple scenes if you’d like!

Getting Started
To start, you’ll find this scene maker in our newly laid out Free Resources section. Here, you’ll find all items in our shop that you can use free of charge, such as our panel and overlay makers. Let’s go ahead and click on the scene maker – the direct link is here. Add the item to your cart and go through the checkout process. After you have the files downloaded to your computer, let’s go ahead and unzip them. As you will see, there is a main folder called “Stream Resources” with two other folders inside of it.


Once everything is extracted we can move on to the settings generator.
Using the Settings Generator
First, let’s start with the settings generator. This is where the real magic happens. In the ‘SceneMaker” folder that we just extracted there’s a link to open up the Settings Generator, go ahead and click that. At the top, you’ll see all the categories of options that you’ll be able to change – you can click these to jump around to different options sets. You’ll also see two buttons on the right. The first will allow you to toggle the size of the preview window to make it larger. You can also click directly on the preview area to toggle its size as well. The second button is to download your settings file, which we will later place in the “Settings” folder. More on that later. You’ll also see a live preview towards the top right. This will give you an idea of what your scene will look like.
Please note that it will contain the default background videos and images – as well as default user names pulled into the labels. We will go over switching these out after we go through the settings that we can change here.

Also, the live preview will cycle through only 1 social network and then the schedule, this is so you can get an idea of what everything will look like quicker.
Options Available
Main Options
Please note that a few items won’t update via live preview. Animations may be interrupted when toggling the display of certain sections.
- Background Type – Do you want to use an image or video for you background?
- Background Overlay Opacity – This will allow you to decide how much of the background color is shown. Slide this up to have a more solid color or down for a more see-through.
- Background Blur – Adds blur to your image or video, if you’d like.
- Background Scale – Scales up the size of your background image or video. I recommend scaling up a bit if you add blur to the background.
- Display Branding – Decide if you want to show a logo in the middle or not.
- Logo Opacity – Changes how solid or see-through the branding image is.
- Logo scale – Changes the size of your logo.
- Frame width – Changes how thick the frame around the scene is.
- Scene Title – The main title of the scene.
- Tagline – The smaller text underneath the title.
Colors
Here, you can use color pickers to decide on what color you’d like to use in the scene maker. Simply click “Change Color” to open these pickers. The box on the right will display the current color chosen. We’ll see that we can drag around to get what we want, and even adjust the opacity of each item.
- Background Color – Color on top of the background image. If you’d like a solid background color, you can move this opacity slider all the way up to 100%. Alternatively you can move it down to 0% to have no color on top at all.
- Accent Color – Used throughout the design. Default is yellow on borders on the labels, for the social media icons and borders, and schedule border as well.
- Frame Color – The color of the frame.
- Primary and Sub Text color – Changes the various text colors.
- Content Backgrounds – Colors behind our label, social media, and schedule areas. Again, you can adjust the level of opacity if you’d like.

Labels
There are a maximum of four labels that you can show at a time with the scene maker. Each one will allow you to change the heading message. For example, you can change “New Follower” to “Latest Follower” or whatever message you’d like it to say.
- Display Labels – Choose if you want this section displayed or not.
- Label Headings – The name of each label section. Such as “Recent Follower”, “Top Tip”, “Latest Sub”.
- Label Paths – Name of the text file to import into the scene. Match the text file names from the Muxy Ticker or StreamLabs Stream Label program.

You can hide any label by simply leave the header area for each one blank. I highly recommend only using the text files that provide a single user name, the ones that you would normally have scroll will not work well here.
Schedule
An animated schedule display is built into the scene system. If you don’t have a set schedule, you can use Display Schedule to hide this area completely.

Here, you’ll be able to set your times for each day of the week. Let’s say you don’t stream on Sundays and Wednesdays, just change the text to say “Off” or something like that. Simply change the text box for each day, to have it be displayed in your scene.
Scaling
This will let you increase or decrease the sizes of each section. Simply move the slider for each respective section you want to change. You may need to wait for the schedule or social media areas to show, to see the changes you’re making.
Fonts
This section allows you to set various fonts to be used, as well adjust their most font sizes and vertical positions.
- Primary Font – The main font in the scene.
- Sub Font – The secondary font in the scene.
- Size Sliders – Changes the size of the font for each respective section.
- Vertical Offset Sliders – Changes the vertical position of each respective section.
To use the font pickers, click “Search” and you’ll be presented with all the fonts that Google fonts offers – which you can scroll through. To narrow things down you can use the category buttons to select types of fonts you’d like to use.

If you’re a bit overwhelmed by the amount of fonts found in the scene maker, you can check out https://fonts.google.com/ to see full directory of fonts available. It contains featured and the most popular fonts – making it a bit easier to navigate. Then just come back to the settings generator and search for the name of the font you’d like to use. I’ll go ahead and search for Oswald, which is a font I’ve used before, select it, and then click close.
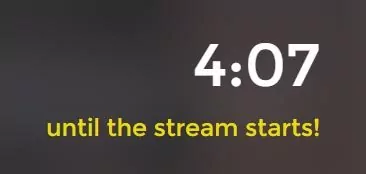
Countdown
The countdown is built into the scene maker and is perfect for intro scenes. Let your audience come in before you do your official greeting!
- Display Countdown – Show or hide the countdown. Some scenes may not require a countdown.
- Countdown Time – Time, in minutes, of the countdown to last.
- Message – Message displayed while the countdown is active.
- Over Message – Message displayed when the countdown ends.

Social Media
Finally, we have the social media section. This section has built in animations, and will help get your viewers connected with you on Twitter, Facebook, Instagram, and YouTube!
- Display Social – Show or hide these animations.
- Network Name – The Name of your media for each respective network.
- Network Headers – The heading you’d like to show above each respective network. For example “Follow me on Twitter”.

You can hide specific networks by making the text boxes blank for any social media popups you don’t want to show.
Adding in Your Settings File
Click the download button to save our settings. If you’d like to make additional settings files for future scenes, you can do so by editing again, and clicking download when finished.
Let’s finish up with this scene. Now that your settings file is downloaded. You’ll need to place it within the settings folder. This file should be the only file located here. It’s full file name is settings.js – make sure the file is called this when places in here. Sometimes, if you download multiple files, your computer will add a number at the end of the file name, such as settings (1). To use the settings file in our scenes, we’d need to remove the (1), and ensure the file is just called settings.
Adding Your Scene Into OBS or Other Streaming Software
Add your scene into OBS, or whatever streaming program you use, so that we can see everything is working so far. For OBS, let’s add in a Browser Source. We’ll want to add a Local File, then hit browser to select the scene.html file that we’ll find in the “SceneMaker” folder.


Set the Width to 1920 and Height to 1080. “Shutdown source when not visible” can be checked if you’d like. Make sure that “Refresh browser when scene becomes active” is checked. Once you hit okay, you should see your design so far.
Linking the Labels Text Files
To properly link our StreamLabs Stream Label, Muxy Ticker text files, or any other program you may use to generate text files on your computer, we need to link things up properly. The “Text Files” folder needs to be stored in your main folder, and will be used to pull your latest followers, tippers, and subs directly into the scene. So to be clear, my “Stream Resources” folder has the “TextFiles” and “SceneMaker” folder in it currently. This will allow us to use the text files folder for multiple scenes that we may create later.
The following step is optional, and only needed if you want your scene to display your stream supporters automatically – so if you don’t plan on having your latest followers or top tipper shown in your scene, or perhaps you don’t want to move your text files from where they are currently saved at, then you can skip ahead. All we need to do is set Stream Lab’s Stream Labels or Muxy’s ticker to save the files in the “Text Files” folder.

Let’s quickly go over the steps for each program. Remember, if you use these programs already, you’ll have to go into your streaming program and update the file paths to your proper text files, or they will not be displayed – as they will be moved and no longer updated.
With StreamLabs Stream Labels
For Stream Labels, you will open the program, login and click “change output directory”. Then, simply select the “TextFiles” folder. All your files will now be moved to this folder. You can go back into the settings generator and update the file path names if needed.
Remember, if you update your settings.js file, that there is only one file in the settings folder with the proper name.
With the Muxy Ticker
With the Muxy Ticker, simply log in, click the settings tab, and then click the file directory. Navigate to where your “TextFiles” folder is saved and select that folder and hit “select folder”.

Adding cheers via Muxy Ticker is possible. You will need to add /cheer/TheNameOfTheFile . So, the most recent cheer using Muxy Ticker, will look like /cheer/most_recent_cheerer in the settings generator path.
Again if you update your settings.js file, that there is only one file in the settings folder with the proper name.
Replacing the Background Image or Video and Logo/Branding Image
Background Image or Video
Go into the “Scene” folder and now into the “Backgrounds” folder. Here, you’ll need to put the image OR video that you want to use. You could also use a solid background color if you’d like – as shown in the changing color portion. In this folder I have included a default image called bg.jpg and video called bg.mp4. If you do not want to use this image or video, simply delete them. Now, you need to place in your own background image or video.
I highly recommend using one that is sized at 1920 pixels wide and 1080 pixels tall, otherwise you might see some distortion or skewing of the image/video when put into the scene maker. All that you need to do is make sure your image or video has the name of “bg”, and it will work. Images will accept .pngs and .jpgs, videos will work with .mp4s and .oggs. Let’s say you want to use a jpg, make sure it’s called bg.jpg and it’s the only file in this folder. For a video that’s a .mp4 it would be named bg.mp4 and put in this folder.

Alternatively, you could delete all images and videos in the background folder, and then simply add your background image or video playlist into OBS directly. However, you wouldn’t get the background blur effect without adding a filter to it in OBS Studio.
For example, if you delete the background images completely, you could put your gameplay capture behind this scene in OBS, and create a cool overlay while you wait for a queue to pop.
Logo/Branding Image
For the logo or branding image, the same type of thought process applied. Again, if you don’t want to add an image here, you don’t have to. Let’s go to the “Logo” folder, and drop in the logo you’d like to use – this one will need to be a .png file. There’s plenty of online image converters, such as TinyPng, and I do recommend higher res images here. Somewhere around the 1000 pixel by 1000 pixel mark.
Creating Multiple/Different Scenes
With that, you can refresh one final time and see your scene in all its glory! Take a quick moment to double check that everything looks great. Let’s talk about how easy it will be to make multiple scenes now.
To do so, all that you’d need to do is go into the main folder, copy and paste the “SceneMaker” folder. You can rename this folder anything you’d like. For example, I’ll just call this one “BRB”. Now, simply update your settings as needed – perhaps you’d like the title and subtitle to say a different message. Maybe you don’t want the countdown shown here.

Download, and then take the new settings file and place it in your new scene’s settings folder. Just make sure you override the old file if it’s in there. Make sure the file is named “settings” and not something like settings (1) or (2).
Finishing Up
This is quite a long post, but again, this is something we put a lot of work into. We want you to have as many options as possible so that you could customize this to your needs. If you enjoy this type of product let me know by sharing or commenting.
If this kind of thing is popular, I will be happy to make more like it, and even better ones in the future.
New Posts

Premium and Free Twitch Overlays Templates
Twitch overlay templates are what we do best. Here is a selection of freebies…
0 Comments6 Minutes

Streamers VS Mainstream Media
The digital landscape is ever-evolving, and with it, the rise of streaming in…
0 Comments7 Minutes

Free Twitch Overlays, Alerts, and Widgets
Free twitch overlays, alerts, and stream widgets are something that we’ve been…
0 Comments9 Minutes


Thanks so much for all of this! One question: is there a way to increase the time in between the schedule/social panel pop-ups? I’d like for it to only pop up every five minutes or so.
Love the scene maker. One thing though, as an OBS browser source, video does not seem to loop with HTML5 controls. Do I have to save the bg.mp4 differently?
i sorted it out.. had to add
$(‘video’).attr(‘loop’,’loop’);
to the Scene.html file in the bottom script section to get it to preview correctly in OBS
Very cool. I’m going to test this out and apply as an update for everyone else.
It should’ve worked as loop is set, but perhaps the syntax it uses, the browser source doesn’t like.
Thanks!
I think I have about the same problem. My loop doesn’t work in OBS (studio) but it does work when opening the HTML file in the browser. The loop fix is already in the HTML file. Does anyone have any suggestions?
where did you put the loop fix? can you cut the js snippet and put it in pastebin.com or something like that.
Also be sure to use the clear cache button on the properties browser source page on OBS
https://uploads.disquscdn.com/images/22830cf5a37e96b8f141fd8dda3658bf9dd781c9e790da076f474939e402bf1c.jpg
It was already in the file I downloaded. However originally it was put in like this: $(“video”).attr(“loop”,”loop”);
That didn’t work either 🙂
yeah.. that looks good to me. latest version of OBS?
Also… Atom is very nice. 😉
Hahaha yep, well only solution now is to make my own 5 min loop with a 4k background -.-‘. However I have a similar problem with the default vidio (it doesn’t load at all in OBS) so I might just reinstall the whole thing. Hahaha I only have Sublime because of an school project many years ago. I’ve never used it since until today xD
doing 4k backgound could waste alot of cpu time
Not sure if OBS supports 4k vids… are you even streaming to 4k video (perhaps on Hitbox)? Could be limitation in OBS as mentioned by others + use a lot of CPU.
I actually updated the file because of Eric’s suggestion. I think the version of Chrome that some people run don’t support the original way. But 4k video could be the issue too!
I tried this but it does not work. My video still does not loop. Any other ideas?
can there be a way to load a setting file? i want to reproduce the scene but opening the scene maker sets it all back to default. i don’t remember the old settings.
Hopefully in the future, we’ll see!
So I’m trying to replace the BG image and logo with my own, and it’s not? I’m replacing the title of my background to “bg” and logo to “logo” respectively, but when I load up Settings Generator, the default logo/background appear, even when I deleted them from the folders. Halp!
That’s weird… are you sure you’re adding in the proper one in your browser source? Perhaps you downloaded it twice or something like that? If you delete the files, then there’s no way they will load. Not sure on this at the moment. Can you upload a few screenshots via the Disquss image button. Send a screen cap of your settings inside OBS plus your folder where everything is stored.
https://uploads.disquscdn.com/images/bff36f3ff219c399de4e2eaf66f92efabd77a682dd90841c1e50ba4d71b56757.jpg I am running into the issue where the entire image is just much to big. When I kept the resolution at the default OBS settings (800×600) and the image was only partially there, like it was cut off.
Now I set the resolution to 1280×1920 it sizes the scene smaller with black all around it and cuts the image off just after my title.
This isn’t working properly on Xsplit, the frame rate is practically at 15-25. The background video doesn’t play either. Also the twitch social popup runs at an awful fps as well for some reason. Anyone else using Xsplit that can help me out?
https://uploads.disquscdn.com/images/26487dc273c861f266a45b605f6e71764ed02af8b0e3c62d4a03a2f0533d2334.jpg Made this scene as test but it’s not loading up properly for me? all the codes on top is all I get 🙁
I think you accidentally added the JS file, instead of the HTML one.
Does Anyone know how to add sound to the scene maker?
Just add sound sources to your scene 😀
Was there a plan update this at all? I’d love to see an import feature to take existing settings.js files and tweak them? I’d also like to see a way to be able to control the opacity of the social media background layer. Over some games, they can easily get lost.
Thanks
Sort of… we found it to be a bit difficult for imports. Instead, we’re thinking of making a new version (very soon) that improves a lot of features and works better overall.
Ahh, ok. Thanks for the update!
For some reason, the downloaded settings.js file isn’t saving the background blur, and isn’t reading the bg.jpg or bg.mp4 files in the Background folder. I’ve tried redownloading the file several times, and every time I put it into XSplit, it just omits those settings. Any ideas? Or is it not compatible with XSplit?