Animated Cyberpunk Text – After Effects Template
If you’re as big of a fan as we are of Cyberpunk 2077’s digital and glitching title effects, then we have a treat for you! This completely FREE After Effects template will allow you to create your very own animated logo or text with a style that would fit right in the neon lights of Night City! Best of all, we’ve included user friendly controls to make it easy to customize.

User Guide and Tutorial
Custom logo creator
FREE Animated After Effects Template
Designed to compliment our popular Cybernetik Stream Package

Step 1
Download the “Free Extras” from the Cybernetik stream package

Create your very own Cyberpunk 2077 style logo and text with our After Effects template. This is FREE resource from our Cybernetik stream package and can be download right here. Once you’ve installed the fonts and opened the project, the fun will begin!
Step 2
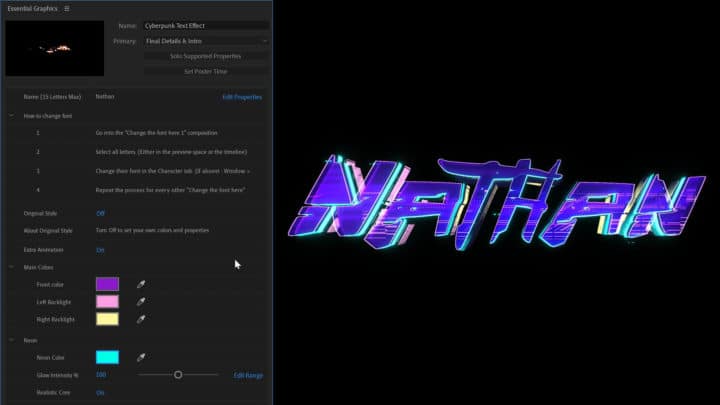
Use Essential Graphics Panel & Type Your Name
Open Essential Graphics
The Essential Graphics window is where we keep a bunch of options to make things even easier. If it's not already visible, to find this within After Effects open Window > Essential Graphics.
Insert Your Text
While looking at the "Render - Static" composition, type in the text you wish to create into the "Name" field within the 'Essential Graphics' panel. There is a limit of 15 characters. Once you do this, you will see it update with your text. It will be a mess - do not worry!

Step 3
Set Your Text Nicely
Open Composition “Set Your Text Nicely!”
This composition is where we get to control the layout of our text. At this stage it will still look a mess. To get started tidying things up, do the following:
- select all the letters (Ctrl+A for Windows OR ⌘ + A for Mac)
- with all letter selected, open up one of the collapsed layers and navigate to the Transform controls
- set the Scale to 100% and Rotation to 0%
Adjust positioning and scale to suit
This may take some time to get right, but we have two tips that may help.
1. Holding Shift when dragging the nodes will keep the letters in proportion
2. Pressing Ctrl + R (Windows) OR ⌘ + R (Macintosh) will bring up the ruler. Clicking and dragging your mouse from the horizontal ruler will create a guide for you to place your text on

Step 4
Choosing Colors
Essential Graphics – Color Selection
You've got your text laid out, now it's time to tweak the colors (optional!). In the Essential Graphics panel you will need to turn Off the "Original Style". Then the color choices you make will take effect! This can be lots of fun - we recommend vibrant and neon colors to help create that Cyberpunk vibe.

Step 5
Changing Font
Open Composition “Set Your Text Nicely!”… again
We want to select all our text again (Ctrl+A for Windows OR ⌘ + A for Mac). But this time, open up the font selection menu (under the Character panel). Choose your new font.
Once again (with all the letters still selected) you will need to:
- open up one of the collapsed layers and navigate to the Transform controls
- set the Scale to 100% and Rotation to 0%
Then you will need to reposition the letters until they look good.

Change the Font here! (1-4)
You'll notice that when looking at of the Render compositions that the font choice has not applied. To get your new font selection working, you will need to use all four compositions called "Change the font here!".
Open one of these and select all the letters (Ctrl+A for Windows OR ⌘ + A for Mac). You'll notice in the font selection panel it appears the new font is chosen, but not applied to the letters in your composition. This seems to be an odd After Effects behaviour.
To fix this, with the letters selected, click inside the font selection area and hit arrow key down, then up to reselect your desired font. You should notice the font change in this composition.
Repeat that for the remaining 3 "Change the font here!" compositions.

Step 6
Admire your creation!


Exporting
How to Export Video, Green Screen or Still Image
The transcription for this part will be coming soon. For now, please refer to the video from the 3:28 mark.
Thanks for reading
We hope this information has helped!
Nerd or Die is here to help. We create products, free resources, and tutorials for anyone looking to enter into the live streaming world and create better content. Our goal is simple: make stuff we’re proud of.


